Creating Stunning Presentation Video Using Canva
Hi, everyone! How are you all? I hope you are all doing well and staying healthy :)
In this post, I'd like to introduce another online tool called Canva that allows everyone to make presentation videos. Canva is a helpful, practical, and time-saving tool and it does make designing presentation slides for the video a lot easier. Some of the features include elements, interesting font styles, and various media that we can use to make our presentation slides stand out. In addition to that, Canva offers millions of beautiful templates with various outlines that we can include in our video. With Canva, we can be sure that our presentation video would be more engaging, eye-catching, and interesting than ever before! Let's see how to make one through these steps:
1. Open https://www.canva.com/ and sign up for free if you haven't made an account before. You can sign in using your email and password if you've had an account.
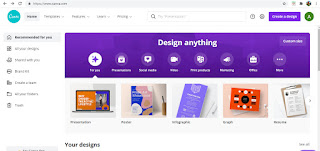
2. After you sign in, you'll see this screen.
3. Before making the presentation video, you need to make the presentation slides earlier. There are 2 ways of making the presentation slides. You may start designing by yourself or use ready-to-use templates offered by Canva.
4. To start designing the presentation slides, click the "Create a design" button. 

5. After that, you will see a blank page and you can start designing your presentation slides. You can begin by choosing templates offered by Canva. You may also use photos, videos, music offered by Canva or you can upload your own. You can also adjust the font styles and add several elements to decorate your slides and make them stunning.
6. Another easy way to make your presentation slides is by making use of the templates offered by Canva. Click the "Templates" button beside the "Home" button on the homepage. And then, click the "Presentation" button.
You will see a lot of beautiful presentation slide templates here.
7.You can click one of the templates and see the variations of the presentation slides offered in that template.
8. Once you find the one you'd like to use, click the "Use the template" button. After clicking the button, you can now see the presentation slide variations in the template. You can also combine your slides with other templates, too. On this screen, you can browse photos, music, videos offered by Canva or you can upload your own. You can also add some texts, adjust the background image, and put some elements to make your slides stunning. You can also rename your project on top of the slide.
9. After you've finished making your project, click the "File" button and click "save" to save your project.
10. Now that you've done making your presentation slides, click the three-dot button at the top right and click the "Present and record" button.


Comments
Post a Comment